This tutorial is for the old PixInsight version 1.8.5.
Click here for the latest PixInsight version 1.8.8-7 tutorial.
After posting my recent M57 image on Astrobin, I received a feedback regarding Drizzle (thanks Marcus!). I never drizzled before since I thought it’s very complicated… It is not!
Drizzle was originally developed for the NASA’s Hubble Deep Field observations. It provides a flexible and efficient way of combining dithered data, preserves photometric and astrometric accuracy, optimal signal-to-noise ratio and approach the best resolution that can be reached with linear reconstruction. (from “A method for the Linear Reconstruction of Undersampled Images” by A. S. Fruchter and R. N. Hook)
I’m so excited about this method… The results are fantastic compared to standard integration. Sharper and more details. Especially small objects taken at short focal lengths benefit from this method.
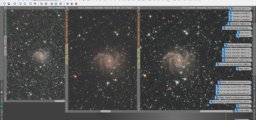
Until now I’ve drizzled the following images (see full size images!!!):


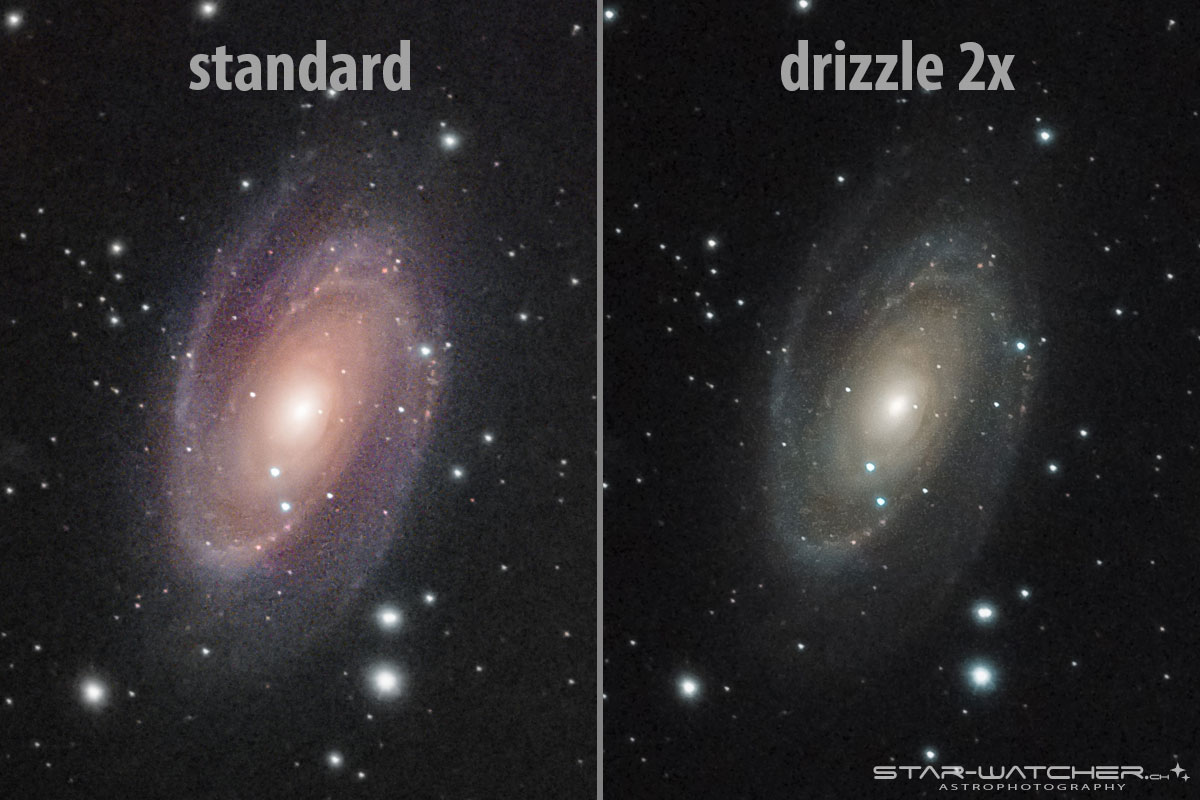

The colors looks different on M81, because I processed/changed colors in the past to reach the well known colors as much as possible. I recently decided to stop that. In the future I’ll only play around with the saturation.
Comparison of different integration methods
All 4 versions are processed exactly the same way (identical values/settings):
ChannelExtraction -> LinearFit -> ChannelCombination -> BackgroundNeutralization -> ColorCalibration -> SCNR (green) -> HistogramTransformation -> MorphologicalTransformation (StarMask) -> CurvesTransformation (RangeMask) -> UnsharpMask (RangeMask)

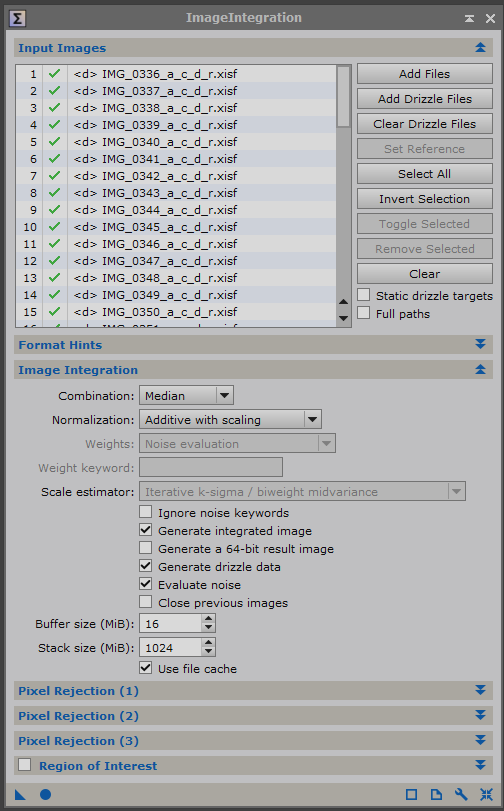
Used Settings
Median, no PixelRejection:
Average, LinearFit
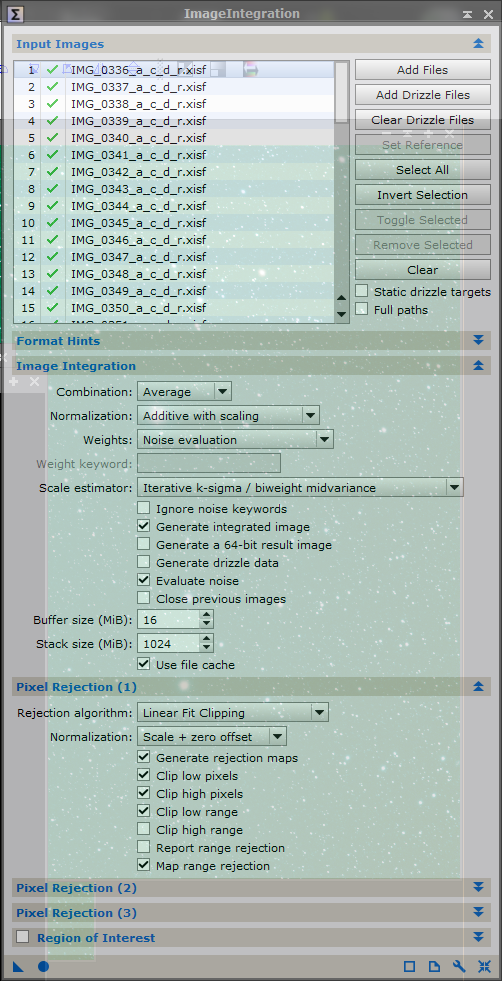
Median, LinearFit

Drizzle 2x (resized)

The drizzled version (based on Median/LinearFit integration) seems to have fewest background noise, M57 has more intense colors, higher contrast and a clear green-blue center. Overall an increased SNR (Signal-Noise-Ratio). Great!
Drizzle Processing in 3 Steps
- To simplify the process I use BatchPreprocessing to generate calibrated, debayered and registered images. These steps also can be done manually.
BatchPreprocessing:
Add bias, darks, flats and lights (I do not use flats) and check “Generate drizzle data” in “Image Registration” section. Uncheck “Apply” in “Image Integration” section to save time 😉


ImageIntegration:
Add registered images and Drizzle files (created during step 1) , select combination method (Median) and check “Generate drizzle data” to prepare the drizzle files for integration (step 3 in this tutorial).
Warning: This step modifies the drizzle files generated in step 1! If you want keep them for later re-processing, make a backup copy now.
Used pixel rejection method: LinearFit (because of more than 20 light frames)

DrizzleIntegration
Add drizzle files (.drz or .xdrz, depended on your PixInsight version), select scale factor (in this example 2x) and start the process.

The result will be an image at double width and height (4 x larger image), ready for processing.
Note:
- Drizzle 2 x = 4 x larger image
- Drizzle 3 x = 9 x larger image
- Drizzle 4 x = 16 x larger image (…only with a super-computer 😉 )
Usually I process the full size 2x drizzled image like any other astro image (finally downsize in Lightroom to 50% to fit the “original size”). Better is to resample the image back to the original resolution in PixInsight (Process – Geometry – Resample)!
M57 standard integration: 5496 x 3670 px
M57 drizzle 2x integration: 10992 x 7340 px

Rejection Algorithms
- < 12 images: Sigma Clipping (or Percentile Clipping)
- 13-20 images: Winsorized Sigma
- > 20 images: Linear Fit Clipping


9 comments
Thank you. Very useful tutorial. I’ll give it a try.
Hi Karol, I have been following your tutorials since I discovered your blog a few weeks ago – my processing has improved a great deal! Very easy to understand flows. You get straight to the point and only provide additional explanation when required. I’m trying Drizzle now on some recent captures. Keep up the good work.
Thank you. Glad I could help 🙂
Hi Karol,
cool website!
I tried to follow your drizzle-workflow. But, where are those .drz files comming from? I can only find those .xdrz files generated by the batch script. Should I use them? If I input them into the drizzle integration dialog, I get this large picture, but there are tiny colored artifacts.
Grüße,
Chris
Hi Chris. Thanks.
As you mentioned, since the last update of PI the file extension for the drizzle files is xdrz. You’ve to use them.
I think you skipped one step after the BatchPreprocessing script: You have to run the normal ImageIntegration process, before you start the DrizzleIntegration process. Maybe thats the reason for the artefacts. See step 2 on my tutorial (2. Image Integration) / Or simply follow this process order:
1. BatchPreprocessing (creates the initial xdrz files)
2. ImageIntegration (modifies the xdrz files created during the BatchPreprocessing)
3. DrizzleIntegration (using the xdrz files, modified in step 2)
Hope it helps. Otherwise feel free to write me again.
Clear Skies
Karol
Hi Karol,
thank you! After a long time, I was able to find some time to redo the drizzle again and it works! As you mentioned, you have to run the process twice – the normal integration and the drizzle integration.
Clear Skies!
Chris
Hi Karol!
Thank you for sharing your knowledge with us! 😀
I have a question regarding the image resolution…
Do you suggest to process the drizzled image before resampling it to the native resolution (then the drizzled one), or after?
Apart from the weight of the final image, which is the convenience of resampling the image to the native resolution?
Thank you in advance!
Frank
Hi Frank
Sorry for my late response. I suggest to resample the image before further processing. This way it’s less cpu/ram intensive.
In my experience the resampled processed image has far better quality (sharpness, details) than the native processed image.
You can simply try it by processing the undrizzled image vs. drizzled image vs. drizzled resampled image and see the differences. Then decide what looks best for you.
Hope it helps 🙂
Clear Skies
Karol
Thanks for this. I never understood what Drizzle does and many YouTubers suggest Don’t touch it. I’ll certainly give it a try.