First, there are 2 possibilities for a comet animation: Static comet or static stars. I’ll show here both ways since they are very similar.
Note: these are very quick processing ways. They are surely improveable 😉
To achieve a smooth animation it is very important to shoot a gap-less image sequence!
This means no battery changes or breaks during the shooting.
This means no battery changes or breaks during the shooting.
Static comet
- Run BatchPreprocessing
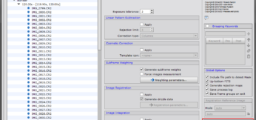
- Open Process – CometAlignment with registered images (c_d_r files can be found in subfolder “registered” created during BatchPreprocessing)

- Add Files
- Select Reference image (I achieved the best results if I choosed a reference image from the middle; less black areas on the edges)
- Set Reference
- Set Output Directory
- open first and last image
- Select the comet whitin the image (use STF AutoStretch)
- Run CometAlignment
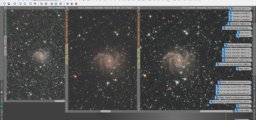
- Open Process – Blink

- load comet aligned images (c_d_r_ca created during step 2 in this tutorial)
- Show preview movie by clicking play button
- If everything looks OK start “Make Video” tool

- Select output directory
- Ensure that “Delete video frames” is unchecked!
If you’ve ffmpeg.exe on your PC, you can export directly an AVI video
Additional you can use the PNG files in other applications like AfterEffects - Start export
- If ffmpeg.exe is missing, an error appears at the end of the process… just click it away)
- Open the generated PNG files in your preferred application to generate a movie


Static stars

- Run BatchPreprocessing
- Open Process – Blink

- load registered images (c_d_r files can be found in subfolder “registered” created during BatchPreprocessing)
- Show preview movie by clicking play button
- If everything looks OK start “Make Video” tool

- Select output directory
- Ensure that “Delete video frames” is unchecked!
If you’ve ffmpeg.exe on your PC, you can export directly an AVI video
Additional you can use the PNG files in other applications like AfterEffects - Start export
- If ffmpeg.exe is missing, an error appears at the end of the process… just click it away)
- Open the generated PNG files in your preferred application to generate a movie

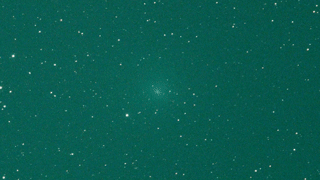
Result
I use AfterEffects to optimize the image quality (brightness, contrast and color) and slow down the speed. But there are many other applications to create a movie from an image sequence.